Friday, March 8, 2013

Washcloth Roses


Not too hard, and it gets easier with each one you do. So may require a little repetition/practice, so be patient and don't stress.


What you need: Your call, but I used a mixture of toddler spoon and forks, but baby spoons are just as good and of course, washcloths! 


If you aren't adding to a cake and want to make a bouquet  get a baby bottle. After this project I found a great Youtube video if you want to peak. She does this pretty similar to me, so don't worry if it's easier to copy that way then going photo to photo, step by step way with me. She also includes the last of the bouquet steps.


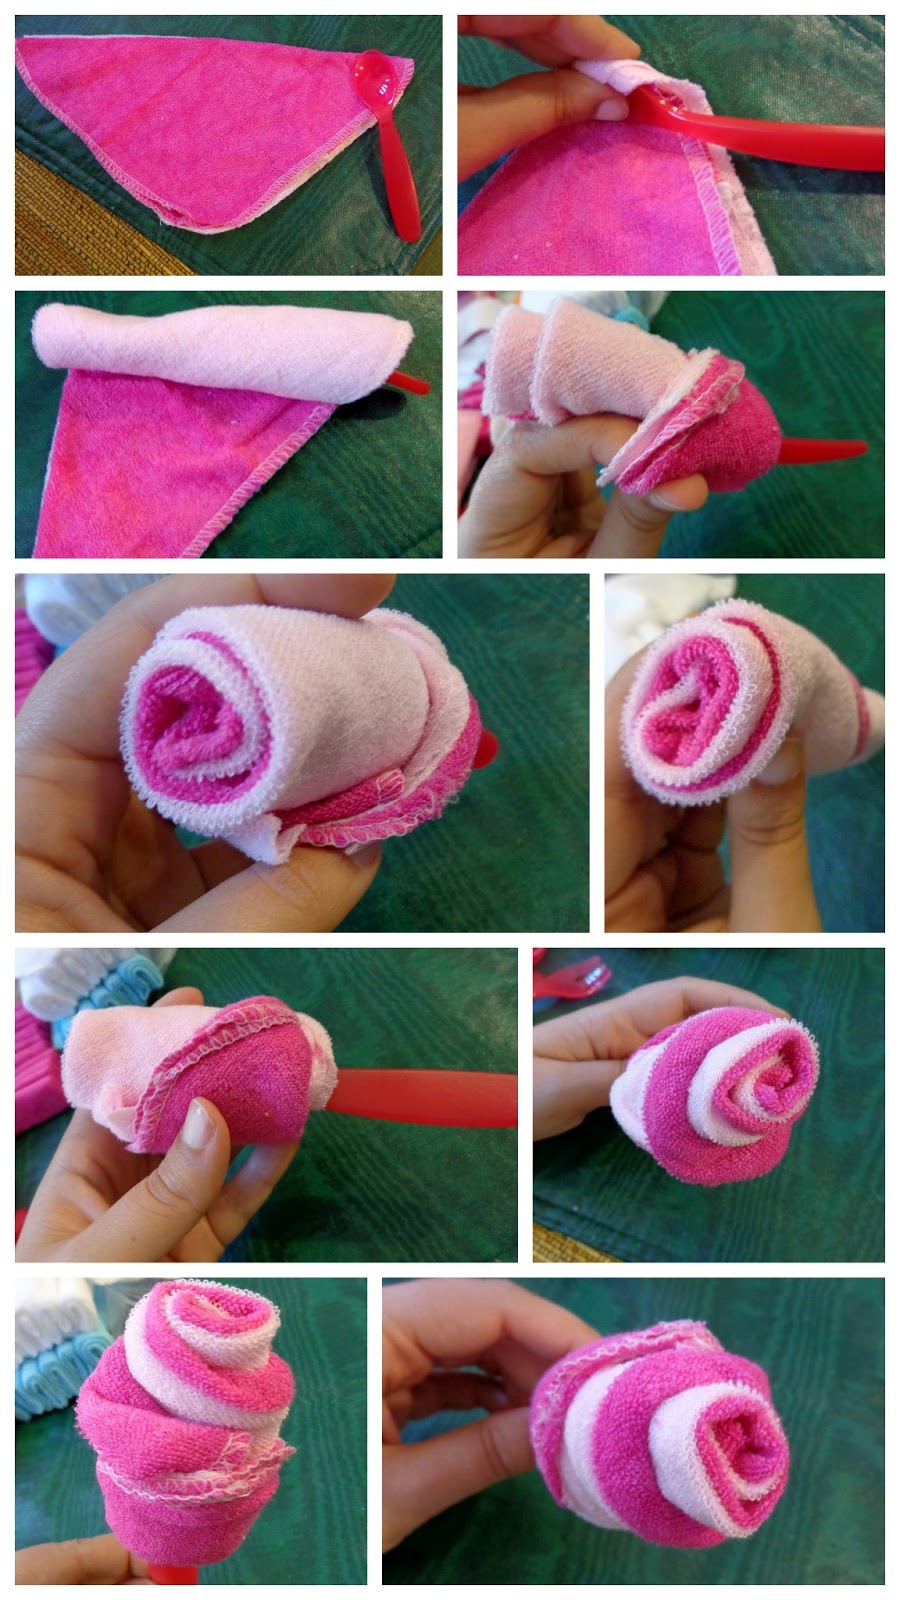
This is for a 2 tone rose. Fold each washcloth in half and lay like image above, grab your fork or spoon and start rolling.


It should be looking something like this, a tube of washcloth.


Grab your mid section an pull it's way up and over the top half. The little flap end will end up tucked in and you should be tight, no tape required. 


Now push back the tops of each layer, giving it a petal like look.


End result should be something like this. If your spoons/forks are like mine there's a slight bend to it. If you are adding it to a diaper cake you may want to adjust the rose to the bend. It's easy just grab, close fist tight, and turn the fork/spoon to desired way.


My end product, if you need help with the diaper cake step see this blog post: Diaper Cake. I ended up doing 3 of each color on it's own and 2 duo tone. Used the leftovers to stuff the beanie topper.

Here's the steps condensed if it helps:


Thursday, February 28, 2013

Books to Make


As some of you know from my previous post (Family Photos), I'm a big
fan of Shutterfly! Lots of times they give out free codes for books or have
a Groupn deal. Use them up! Here's some ideas to make the most out of
them! Yes, the usual baby's belly-birth, all the big firsts, and birthdays are
great books. All and any idea you have will be cute and amazing, but this
is our new age of scrap-booking, so I have a few ideas that go beyond the
obvious.

Learning is key in our house and this custom ABC book just for our Riley
was a great tool to grab her attention and be a little more to the Alphabet
then just a typical book could do. Even if you think you don't have a picture
for all 26 letters I bet there's at least something in your child's life that you
can take a quick snap shot and add in. The funny thing is when I was
searching through all our random pictures I almost wanted to give myself a
pat on the back when the image fit the letter in multiple ways, like A. A for
Art & Alligator. Hehe, sometimes it's the small things!


Photo books are the perfect gift for any occasion.

Another book I made especially for our little one was a family book. If your family is anything like ours more often then not the family is all over the continent if not the whole globe. It can make it really confusing, especially when she was younger and sadly we all don't get nearly as much Skype time as we all would like. This was just our little way to help reminder of who all loves her and that there is more beyond just Mom and Dad. We also had lost a love one from our book and this will always keep his place in her memory and heart.

Click here to create your own Shutterfly photo book.

One last idea! GIFTS! Books make GREAT GIFTS! Very sentimental and can hold more meaning on that random holiday then any flowers or a card could even begin. We've made a couple in this train of thought, but I'll just share the "Grammy & Me" book just to give you an idea.

Shutterfly photo books are the new way to preserve your memories. Create your own today.

Shutterfly has templates and more examples if you get stuck, but I hope this helps you cherish memories in a new fun way!


Thursday, February 7, 2013

Valentine's From the Heart


So this was Riley's BIG first year in a real class and a chance to make Valentines. The more I thought about letting her get store bought, the more annoyed I got and less likely it seemed. I spoke with her teacher about how the class deal will go down on that day. I'm lucky she's in a school that gets to observe all holidays, so Valentine's Day would be a thing, but she said something else. I asked if she was passing out lists of all the kids' names so they can be addressed, and she said, "No. The kids will be passing them out themselves and it seems to take way too long when they have to find each kid's name." So true, it's only Preschool, seems kind of duh! It's cool that they all get to go around and pass them out themselves. I thought it would be a parents and cubies or goodie bag deal, so this is way better. With the no name thing, I also was thinking well if it's store bought how do I avoid the TO/FROM's? My all sooooo smart husband mentioned later "To- You, From- Me." He had a point, but oh well I still think our hand made touch will be better. I'm sure we have many years ahead of us for the pre-made character ones, so we're gonna enjoy this!


We ended up at the Dollar Store and I let Riley pick out her own choice things to make her Valentines. I must admit she did a good job. Stickers and some heart shaped dollies, and the best thing was it was a 24 pack (just the same number as her classmates).


Added to our store pick up's a pink bingo dobber, pink glitter glue, red glitter puffy glue, and a few sharpies of the Valentine color array.


Now the fun has begun. Obviously, Riley wasn't to the spelling "Valentine's" part yet, so I wrote out on her lined paper what to copy and she did, with a few variations here and there. She was good with the heart and the "Riley" part, but I didn't want her forgetting so I wrote it to.


I also let the decorating and exact styling completely up to her. We had a little assembly line going. I gave her one doilie at a time, would point to letters if she needed, removed the done, wiped the table and start over. I had little plastic table places covered in Valentines all over. Couldn't chance them not drying right.


Next day, all 24 done! Dry and made with LOVE! All we did in addition was tape to the back of each a heart lollipop. Now we just wait till the big day arrives to give out to the class.

Seriously the pride on her face, seeing that she made these was way better then any other thing a store bought could had ever been. She really can't wait to give them to all her friends! So adorable!


Friday, January 25, 2013

Painted Glass Bead Magnets


Great idea for a gift or just stuck in the house needing a rainy day activity...also won't cost you an arm and a leg to do.


What you need just depends on what you find, my daughter was lucky to get for Christmas a "Painting Glass Stones" kit from her Aunt and Uncle. The funny thing is they didn't know I had already planned on doing this project with Riley myself.


If you aren't lucky enough to find a kit this is what you need: paint, brushes, strong clear drying glue (I went with Gorilla), magnets, and glass beads. Glass beads/stones should be relatively easy to find. I found ours at the Dollar Store, but I know almost all craft stores carry them. I also used a cheap plastic table cloth, just in case any glue escaped me, but can also come in handy for the painting step. One thing not in pictured that I wish I did was get white card-stock! That step that I wish I did will also require a pair of scissors.

My daughter and sister actually had a fun day and did the painting step while I was having a sick day, but as you see from above they turned out cute. Just paint the flat (underside) of the stone/bead, remember the image is kind of working opposite, mirror like. Let it dry. Acrylic paint doesn't take to long to dry, but if you want to be safe wait a day, paint side up while drying.


Now that it's all dry, squeeze a TINY bit of your strong glue. I devoted a cheap paint brush to smearing it around. Now, if I had thought this out I would had placed a piece of white card-stock to that so the magnet wouldn't had shown through so much, making the paint a little hard to see sometimes. Probably a little square piece and cut it out exact once that step had dried, then repeating with more glue and a little smear. Another idea is tracing the stones and cutting the paper out, I guess it's just up to you.


So let's pretend that painted backside is now a white card-stock part with strong clear glue, drop the magnet to the center. Press it on hard. Let dry. If your glue is like mine it won't take long at all.


All done! Ready to work their magnetic magic on your fridge. You can see in the close up why I wish I added the white paper step. Oh well, there's always next time.


Thursday, January 17, 2013

A Little More for Hyperemesis Gravidarum


By now I assume you've read our story, if not here's the link: Our Pregnancy Journey with Hyperemesis Gravidarum, but in short, it's not fake and it's not something you can just "suck it up and deal with." I literally would never wish that upon anyone, ever. But, if you are going through it know that you aren't alone and their are other survivors out there. There were a few links that comforted me in my time of need and in recent times a lot more is out there and I really hope to share those with you.

Just a fact to keep in mind - Though they say over half of all pregnancies experience morning sickness, only about 2% of pregnancies are afflicted with HG. (Multiple sources say 2% - Wikipedia puts it at .3%-2%)

The biggest, most helpful and now even more awesome site was HER Foundation. Seems that they have more information then when I was suffering and more testimonials which helps big time when you are feeling alone in this. Even when we don't we do, especially when we see all these glowing happy to be pregnant people and all we can do is count down till due day and it isn't cause we are just that excited to see our child.

Image from Deranged Housewife

"Hyperemesis gravidarum: not your garden variety morning sickness" - "The Deranged Housewife" did a great write up on HG and really the image she provides that brought me to her site to begin with says it all. That is exactly how I felt when dealing with the public and mostly at the work place. 

I wish I knew these books were out there during my battle, but I hope these help you: "10 Honest Books for Women Suffering from Hyperemesis Gravidarum" Though I must admit some even seemed silly to me, I can still see how it may work, especially the child's "Mama has Hyperemesis Gravidarum (But Only For A While)."  If you are battling this and don't know how to explain it to your other children. I didn't really know how to explain it to my husband, I can only imagine how hard it would be if I had another child while battling with this.

As always Web-Md is there if you want more then your doctors are telling you. Remember knowledge is power and you don't have to always just believe what your doctor is saying. Yes, they are probably right, but it's always good to know a little an not be pushed into something you aren't comfortable with.

Finally Circle of Moms has tackled the topic as well. To be honest their's is not as comprehensive, but it's a good place for those around you to get a short feel of HG or a beginning step if you are just starting to feel like this isn't really just morning sickness that you are dealing with.

Don't forget to search around Pinterest, in light of Will and Kate's new baby-to-be causing the Duchess of Cambridge to have HG there are a lot of others coming out about this. This is no longer a battle you have to fight alone.