Friday, September 21, 2012

From Bump to Baby Buy & Register Ideas


From the moment you find out there will be a new little soul in your life the urge to buy and spend will be strong, but before you do let me share some items that I found to be helpful and some idea of what to register for, because trust me as fun as it is to run around a store with a scanner gun you don't want to over whelm your baby shower guests.

The BIGGEST & BEST tip I ever received as a future parent was this: With EVERY paycheck, buy at least 1 box of wipes and or a random size of diapers. Seriously! This was the best lifesaver ever! We bought all the way up to size 3 an we didn't have to buy any once our child was born till we started the potty training stage. When you buy just remember sizes Newborn & 1 will be for a tiny period and in our case 3 seemed to last the longest, but each baby is different and this is why I say buy a bunch of random sizes. Honestly do it! You will be happy when the time comes. Plus, if you are lucky your baby shower guests will give you some in addition, check out "Diaper Raffles" as a baby shower party game idea to encourage it.

Also a tip on the prego book buying...SAVE YOUR MONEY! Really there are so many awesome sites out there that will even send you what's going on this week (I still get my Baby Center updates on the kiddo). Really if you buy a book I would skip "What to Expect You're Expecting" and buy the daddy-to-be, "The Expectant Father,"  it's a great one that we past down to expectant dad's in our group of friends. Another book I LOVE and we used through out baby's 1st year was, "What to Expect the First Year." I did have a pregnancy diary, "The What to Expect Pregnancy Journal  & Organizer," but sadly as the pregnancy continued I stopped filling it out. I just felt like I was repeating and it took away from the pregnancy writing down my battles (I had hyperemesis), but if you are one to scrapbook everything you may want this.

The belly items that I couldn't have lived without an think made a world of difference: Coco Butter and Bebe Sounds Prenatal Gift Set.

The butter just helped with the itchiness of my belly. It didn't really stop the stretch marks from coming, so sorry if you were hoping for a cure.

As for the Prenatal Sounds, it really didn't deliver for the whole "hearing baby's heartbeat" part, but we defiantly got to hear our little one kick, but I really liked this item as a means for Daddy-to-be to bond with the little bun in the oven. All day baby gets to hear Mommy talk, but this allows Dad to tell stories to and baby to get use to his voice, just as much as yours. My husband & I made a point every night for him to have little chatting sessions, sometimes he would read a book, other times he would force us both to listen to the stories of the "Legendary Chicago Bears." Btw, I'm a Chargers fan, so those moments weren't my favorite. ;)  In addition to that, it's able to hook up with your ipod, so our Riley got her own baby playlist to listen to in the womb. If you can find something like this & it's in your price range go for it!


Registry Time! Like I said, it's really fun & yes, you'll wanna scan everything, but don't. It really makes your guests have a lot more work and odds are you'll get more items you really don't need that are "cute" and be stuck buying actual items you do need yourself.


BIG ITEMS:
Crib (If you can & are wanting baby in your room you may want a bassinet for the first few months) Mattress Pad
Diaper Changing Table
Diaper Changing Table Pad & Cover (You can skip, but I was happy we had ours. Saved my back.)
Stroller, another personal choice, but we used a jogger the whole time. It was much easier to open, close & use where ever we needed it. Eventually we bought a umbrella stroller as back up, but it only got used once or twice tops.
Car seat, typically matches your stroller choice.
Pack N' Play/Play Yard/ Travel Crib, our's was great for time at Grammy's.


*Remember Babies grow FAST! Register for many many different sizes and items that will grow with them you'll get the most out of. Also try to think what season your little one will be arriving in. Obviously, won't want hot clothing for summer or vice versa.

Little Stuff:

Clothes-
Layettes, Onesies, Gowns (sleepers), Tops, Socks
Hats & Mittens, though you will probably use socks over mittens, warning.
Bibs, not the fancy, oh so cute ones. Odds are you'll get those, but the cloth over plastic good for feeding time ones. You won't care if they get ruined.
Burp cloths
Cloth Diapers (these work as even better burp cloths)
Receiving Blankets
Swaddle Size Blankets, swaddling is God's gift to parents! If you are confused, check out Happiest Baby on the Block.

Bath-
Washcloths (You'll probably end up with a ton, even if you forget to register.)
Towels
Bath Tub
Butt Paste, no joke less mess then other diaper rash creams, LOVE IT!
Infant Safe Nail Clipper Set
Diaper & Wipes

Nursery-
Diaper Champ, personal choice, I liked more cause I didn't have to buy special trash bags like the Diaper Genie requires.
Baby Monitor (Get 1 that can move with you, so you aren't stuck by a outlet when you move your end)
Bedding, typically your theme item for the whole nursery
Dry Mattress Covers - Having a few on hand are a big help, you never can predict a diaper leak and it saves  the mattress big time!
Crib Sheets, 4 is a good number.
Boppy! A mom's best friend :) (You may want to register for a additional cover to have on hand.)

Play-
Tummy Time Mat/Gym
Jumper/Stationary Entertainer (Walkers aren't recommended anymore.)
Swing & this does not have to be a huge expensive swing, actually ours folded down and was easy to move and our Riley loved it for months!

Random-
Baby Proof House Items, look around your house cause you'll need it sooner then you think.
Nursing Bra Pads, we all leak, sorry, but it's the truth.
Lanolin, if you are going to pump or breastfeed.
High Chair/Booster Seat (We used the seat, it was easier to take with us to an lasted a good amount of time.)
Dreft Detergent

Optional, but Recommended:
Baby Record Book!
Another item that we registered for that most people don't was a Jumbo Toy Hammock. Thing has been a huge help with the stuffed animal over load.

There were a few things that I did leave out, like Breast Pump and bottles. Now, there is a reason, check with your hospital because it may work out better for you to rent a "Hospital Grade" breast pump over buying, an bottles come down to choice. We tried to find ones that were the closest to "mommy's boobs" as we could find, an clearly we are not all built the same. I did have a Medela Pump, which my hospital's Lactation Nurse provided tubing for, but I still ended up relying on the hospital's machine more.


Another really random tip: If you get a gift receipt and they happen to have the gift bag on it, an they didn't write on the card attached or anything, RETURN IT! I know it sounds funny, but it was a tip from some wedding site and I applied it to the shower, well you'll be surprised how much extra baby cash you'll end up with.

Obviously, this is just a jumping point an if you see some must have items for your nursery theme or a diaper bag, a must have outfit by all means scan it, but you would be surprised some items I've seen on registries that I don't know anyone who has used, let alone needs. Sometimes it was sooo much that it just looked like a kid went crazy in a store and I ended up just picking random things that I've liked over looking at their list. Hopefully this gives you a starting point an makes you feel a little less lost in a sea of baby items.


Wednesday, September 12, 2012

Learning Before Class Starts


Sometimes we get wrapped up in the "needs" of the school year thinking that it's really a new outfit, a backpack, pencils and paper an we forget that really the "need" is not to forget that we are our child's first teacher in life and what we really "need" to do is start our kid's off on the right foot. Give them a foundation before throwing them into the school setting. If you have been a follower from the beginning you probably have an idea of how strongly I feel our role is in our children's lives. Also, the beliefs that we should always use teachable moments and being our child's advocate. Well, I just thought it was a good time to share some things that have been a help in our house to get Riley the Preschooler off to her first year of school.

Encouragement is Key! So one day we surprised Riley with a starting school gift. Not expensive and of course with purpose. The fun item was a Team Umizoomi Activity Book. If you haven't heard of this show, click the link now! I'll wait here. It's a great math for beginners, with patterns and measurements. Love it! With that I picked up 2 dry erase boards, markers, erasers & a cute little pen case (All Under $7) and a "Wipe-Clean" Printing Practice Workbook. The point was to get Riley excited an wanting to learn on her own before class even started.


We don't push her to do it, we let her push us. What I mean is it's all bundled together and where she can get it and whenever she wants to we let her come to use with the words she wants to learn. I'm very impressed! You never know what words your little one even knows until they want you to spell them. I personally liked when she asked to work on the seasons the most. The best thing about using dry erase board is it cuts down the frustration. Riley can just wipe whatever letter or word and start again, no big. No eraser bits, no wasting papers.

To grow with the changing times us parents also have to adapted to allow electronics into our kid's lives. I personally just feel this if used right can be another way to sneak some teaching in. To be honest am not really big fan of television so prefer this...an I know it buys my a shower break without walking into hurricane. LOL!

*Image straight from email updates*

After trying out a free-app once upon a phone I discovered a great cell phone item was much more then that.  Zoodles! This really is a amazing FREE or pay, up to you item for whatever device you want. Every week I get emails of what my child was up to and how the learning breakdown went. Fun thing is lots of parent controls, if she's using it on the computer she can't leave it until someone types quit for her. Honestly, there is lots to keep your child's mind going even if just on free mode. If you have multiple kid's no worries. each child has a log-in, all they have to do is click on their picture. Another perk is the emails with all the artwork attached, always the option to save or share.

A few other things we've been working on this summer was coin counting and scissor work, of course awesome Pinterest would have yet a few more sites to help with, so let me share them with you: Scissor Skills, some print sheets for them to practice cutting lines & From Mrs. Prince & Co: The Trading Game, Money Style. We had to adapt the game a little but Riley is now understanding 5 pennies equal a nickel and how her face lights up when you say how much to make a quarter! It's cute, an like I said worth a shot.

Let me also put this in your head while were at it, remember your child is never to young to start learning and it never hurts to try. We are working on the K-1st Grade level most of the time and she loves it. Children love challenges and praise, so what if it doesn't work out, try, try again...just make sure you are making it fun and positive and then your child will want to do it, no force needed. Positive reinforcement goes far.

Oh & if you were wondering, of course we got that all to important 1st day of school picture & I'm happy to share it. ;)

Sign was thanks to the crafty ladies at-

Tuesday, September 4, 2012

"Things To Buy" Fridge Helper


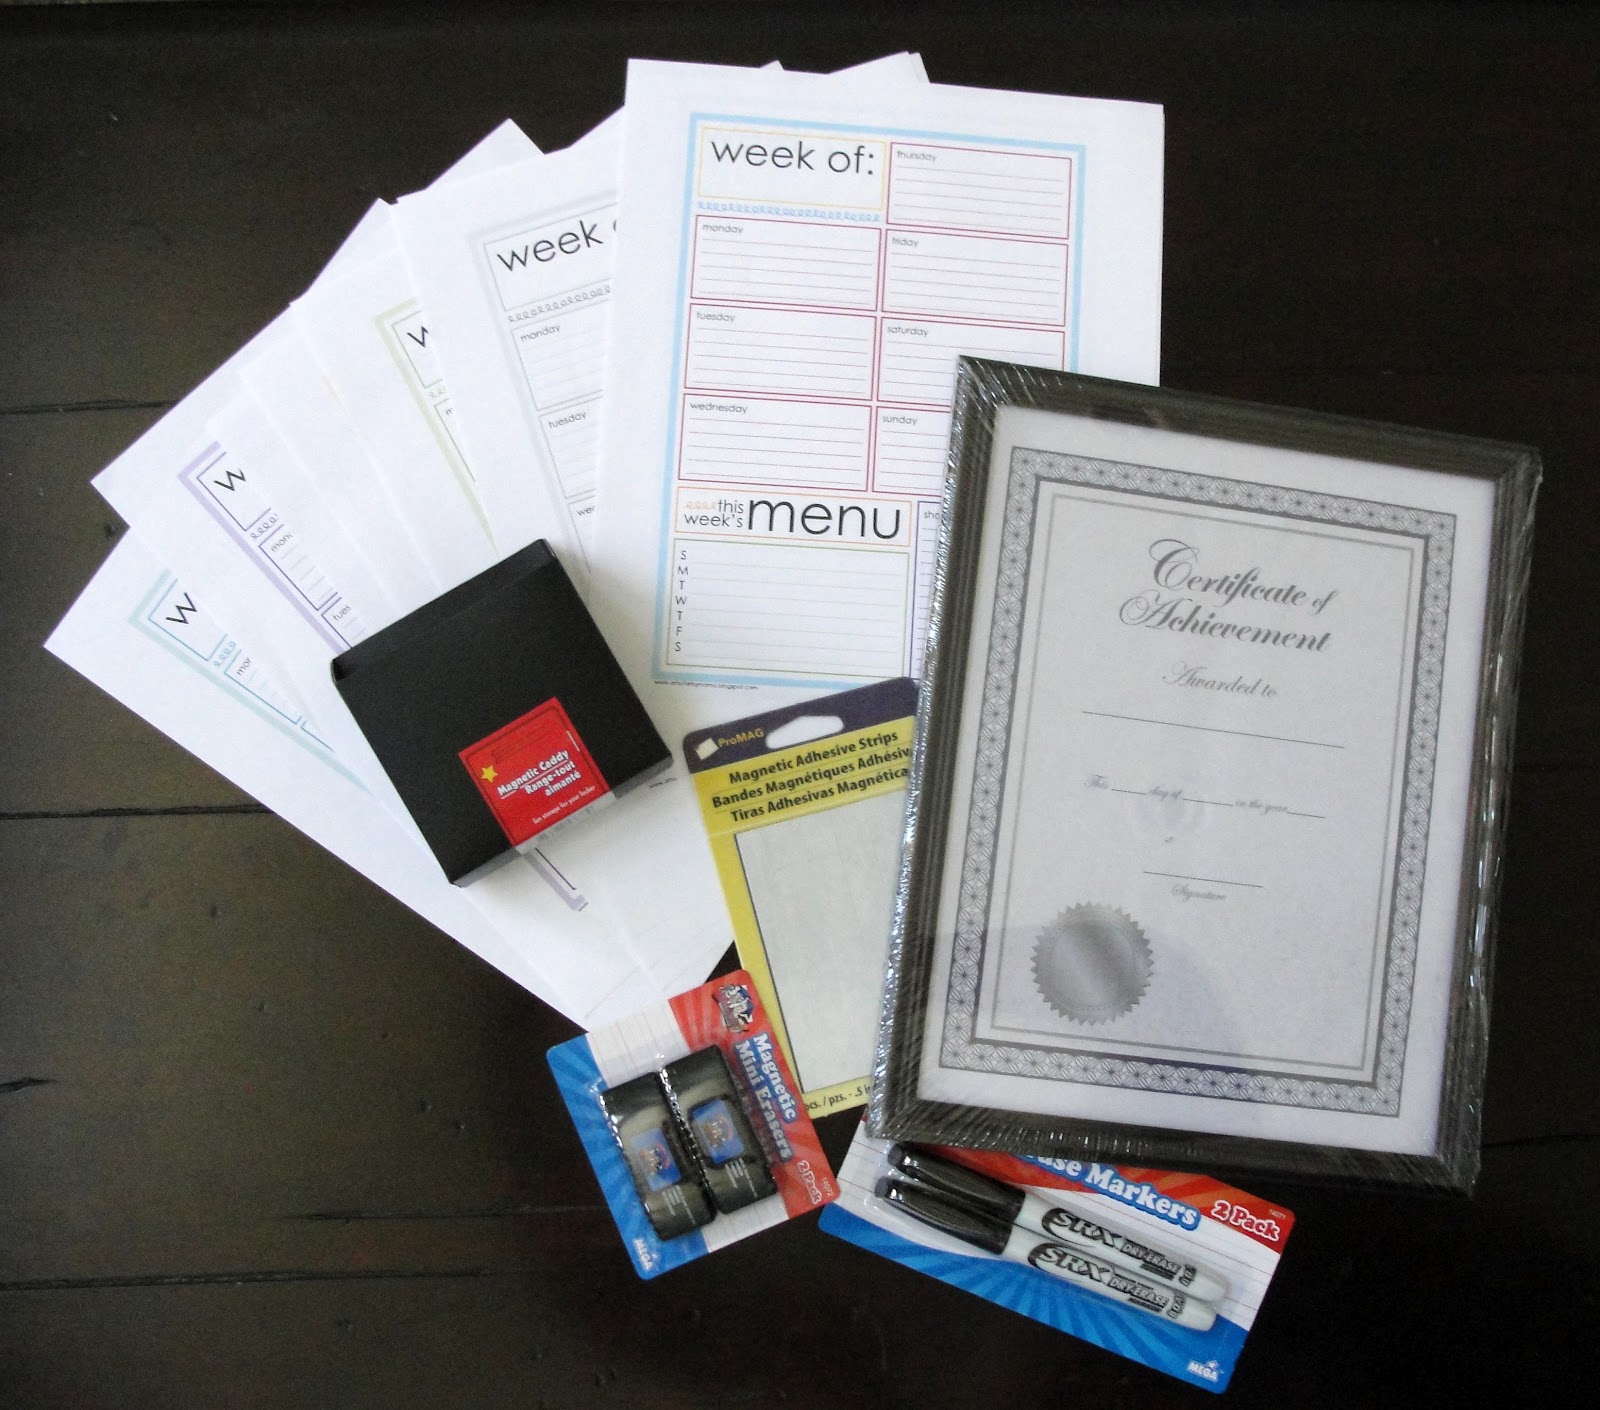
If your house is anything like mine you either are always running out of items or finding that when restocking that the one item you just picked up so did your spouse, gets rather annoying when our fridge is now full of condiments an has less room for actual food. This is where the GENIUS STRUCK, of course I could go the normal route and buy a little paper pad with a pen and a magnet but why do that? LOL! Ok, really I just hate wasting paper so I really don't like it, plus I wanted to try something a little better looking, so here's my idea if you just want something a little different.


This project wasn't as easy as I first perceived. It became a little game of trial and error, but I'll give you what I've learned and you can make the best decision. Let me begin by giving you a list of some awesome sites with some print out organizing sheets that may/may not work for you and your lifestyle needs or at least this project.  The one in my main image came from: Artsy Fartsy Mama (btw, she's AWESOME). There's a huge list of sites complied on: Creative Organizing. I also have a tear off sheet shopping list version idea from pinned from here: Infarrantly Creative. If you chose to go with that sites, you are going to want to tweak the list so you can make it a list but not in the tear off form or go ahead and go with that blog idea, but it won't work this blog. In the end I went with a simple white sheet with a cute script saying "Things To Buy" & a sharpie drawn heart in the bottom corner cause our hand writing was to big for this cute weekly layout. (I'll show you later.)

Whatever style sheet you chose to print you'll put in the frame behind the glass and  use like a dry erase board. Dry Erase Marker whatever you need or to make note of and use your cell phone to take a picture before each store trip so no extra trees killed and just erase off the list whatever you got. Really when do we ever go shopping without our cellphones anyhow? This really makes it easier then finding a little scrap of paper in our purse to.


What you need: 1 Document Size Frame, unless you wanna cut your paper to whatever size this just saves a step. Whatever sheet from the printer. Dry Erase Markers & Erasers. Found ours in the cheap bins at Target. Magnet strips from Micheal's. You will need in addition to picture, craft glue. If you are lucky you will find at the Dollar Store already made magnetic pencil holder. I think intended for "Back to School" locker organization, so check those sections of your stores.


Assembly time. Remove wrapping, blow off dust, the typical fun stuff.


*TIP* If your frame has metal hooks for wall you may want to remove, as to not scratch your fridge.
Now put your sheet in. push Down your tabs and check the width of your magnet strip.


Ours was perfect to go on the cardboard an touch the fridge, if yours won't be so great you may want to cut and glue the magnet into strips to be placed the edge of the frame.


Here's where we had a lesson. We didn't run into any weight issues or our magnets giving out, but originally we didn't add any craft glue. I didn't think of a issue needing to worry about this. I had my husband test slamming the refrigerator door open and shut with out it moving so much as a milometer. We just trusted in the sticker part, well it got so humid that it just let go, we got lucky and it wasn't a issue so I reinforced it with craft glue and now that baby hasn't budged...and it's been even more humid.


It's been awhile now & it's still up an being used, eventually I'll change it out to a cuter piece of paper maybe add a defined Farmer's Market section, but this has really helped us. Hope it helps you just as much.

Monday, August 20, 2012

Pretend Breastfeeding?


Let me start with I know this isn't my typically "DIY for Mommies" fashion, but I felt like this was a conversation with my readers that I had to have, even if it's a touchy subject to some.

Breastfeeding is on of the most wonderful bonding experiences, not only that, but it's a cheaper and healthier route for child. I never struggled with the decision of should I or shouldn't. To me this wasn't a question from the moment my husband and I even began trying for our miracle. In fact we took this seriously and not only took a breastfeeding class, but also meet with two lactation consultants. I honestly feel like it was one of the best decisions I have made for our little one so far...plus it really helps losing all that baby weight...fast. ;) As I say all this and can go forever about the positives, how do I feel about my child pretending to breastfeed?

Last week we were all so happy to have a old friend stop by with her newest little bundle of joy. My daughter, Riley was in awe with the cutest little baby girl, she wanted to do everything for her, it was ADORABLE! She would bring her little toys, keep her blanket in perfect order and keep her laughing. But then it came to food time...Riley offered to give the baby her a bottle an we gently explained she didn't have a bottle, of course that started a puzzled look. We then explained she had her mama. Well the curiosity grew. I have never been private about myself breastfeeding an of course I thought this may be a good lesson time, so I didn't force my friend into a bathroom to hide. We got to explain how much healthier it was. We also got to explain that is why I did that with her. It was good! Riley got to asks us, mamas a tiny bit about it and went on wanting to help with the baby. She even got to burp the cutie (by the way, Riley was very proud when she was rewarded with a big one).

With Riley being a only child it's extra nice just seeing that she loves others and she fully understands it's not all about her, all the time. She actually wanted to help! Was sooo loving and attentive, it was a great thing to watch. She "can't wait to babysit." (Though that is years away.)

Well, shortly upon them leaving she began to play with her babies and mama them...an then pretend nursing. When I say pretend, I mean pretend, she didn't pull down her shirt or pull it up, just held her baby's mouth to the right area over clothes. Here's where the issue lies, we live in a world of obey social norms or be a outcast. But, on the same token, I also didn't want her to get a negative impression of breastfeeding either.

That first pretend moment, I tried to explain that is a great thing for Mommies and their Real Babies, but when it comes to our stuffed ones it's best to give them a bottle. My husband works in the veterinarian field so I also tried to explain if it was a baby animal their mommy would feed them, but if we were taking care of them would we feed them that way? She got it, "No, we'd use a bottle." I took her response and our short little conversation as that it sunk in.

It had been a whole week since incident number one an I hadn't seen her pretend to nurse again, then as she was playing outside with my mother and husband watching she did it again...let me say their responses weren't like mine. My mom didn't talk about it, but I also didn't ask her, but I think my husband might had been horrified. He ran right in the house with her an told me what I've missed. He's first thought was whatever toy she does it with take it away an put it on time out. Just in case you wondered, no we didn't go with that method, but poor dads. I understand, we grew up in a time where everything needed to be hidden and we had little if any education on this kind of subject, especially for the boys. I guess being a girl and having two younger sisters made this less strange to me. But, I still thought that his actions or thoughts of "punishment" was a little extreme and would really send her a bad message about breastfeeding. I hope one day when she is MUCH older, happily married and with a new baby of her own she gives her child the best leg up on the world an nurses. I'm not saying that I wanna run out and get my daughter "The Breast Baby," but how do we walk the fine line of teaching our child positive associations to something that is natural, but denying it as a appropriate behavior?

I truly don't feel at ease either way. I must admit what I once would had sworn up and down that it is completely not okay, but now I almost feel like I'm doing wrong by her. She has a sweet nurturing and loving personality, an I never want to change it. Like any parent I just want to protect my child, so she isn't deemed a "weirdo" and gets treated as a social outcast. I just wish the behavior, although it does come from the right place (her heart) just disappears on its own an this becomes just a limited time action. My reassuring thoughts are just that she still is in "monkey see monkey do" after a bit she'll forget and it won't be a thing. My nagging thoughts were, did I do something wrong by not hiding it in the first place? No way, we have to use teachable moments an I still don't feel like its something to ever be ashamed about, in fact I know I have a ton of pictures of me feeding her.

After the seconded time, I did attempt to repeat our conversation, just like the talk after the first time. She remembered that it was between Real Babies and their Real Mom's. I didn't bother to ask her why she did it, just tried to remind her it's just not something we play about and for now bottles are the best thing for her babies. I guess we'll see if that works.

In my quest to deal with "Pretend Nursing" on the home-front, I found a few articles that I wanted to share, not saying that I agree or disagree with either, but they did make me feel less alone in this motherhood experience: Daughter learns from her mother & 'Play Breastfeeding' is Not Porn.

Thanks for your input and support. I'll admit that this subject was so touchy and personal that even what image to use was a battle. Oh the joys of parenthood!


Tuesday, July 31, 2012

1920's Birthday Bash


This year I turned 29 years old…holy cow! I'm 1 year away from being 30!! In order to celebrate in accordance to what I believe were some of the best years in my life, my 20’s, I thought it would be appropriate to have a farewell to my 20’s birthday bash! I asked for all my dear family and friends to help by coming dressed in their ritziest 1920’s rags. It was overall a great theme! It made it a extra great time with good friends, family and some booze!!

To set the mood I made the invitations from a compilation of other invitations I saw online. I just goggled searched: 1920’s birthday invitations, roaring 20’s invitations and got some ideas, especially for the wording.


The invitations read:
The Roaring twenties are back
INSERT YOUR NAME HERE
Requests the honor of your presence at a
“Goodbye to the 20's” Birthday bash
Guys suit up & Gals show off the glam!
Wear your finest 1920's rags to the ritziest joint in town
On INSERT DATE AND TIME
INSERT LAST NAME Speakeasy
YOUR SHINDIG'S ADDRESS
Prohibition is in the air. Your discretion is paramount.
Please Assume Alias. Admittance By Password Only!
RSVP YOUR STUFF
Hors D'oeuvres, Dancing, & Drinks
…
To make the invitation I bought an 8.5 x 11 cardstock in ivory and a 12x12 black scrapbook pack.
A pack of back feathers, ribbon in 3 colors (I choose teal, purple and green)
I already had the wax stamp and was from my wedding invitations.
I printed 2, 5x7 invites on each ivory cardstock.
In order to figure out how to fit the black paper to fold just a little over I had a little trial and error.
I cut a small strip off the side, then in cut the remaining square in half and then a little of the bottom. Not sure if that makes sense so I made a little diagram, unfortunately I don’t remember the dimensions.

I just placed the ivory invitation on top of the black strip and folded the black strip to give it a black border and to cover most of the wording. I then tied the ribbon around and made a knot. I placed the feather on the knot and with the wax seal glued it in place, and voila!!


Invitations done!
Food?

What to feed my guest was the hardest part. I wasn’t sure if I wanted to stick with 1920’s food since every time I goggled 1920’s food or meals always got some sort of deviled egg, cucumbers and black olive stuff. I’m not a fan of eggs, so I choose to just do a pasta since I’m sure my guest wouldn’t care as long as they ate something yummy, and it is way easier to make pasta, so Fettuccine Alfredo it was.


Now, the cake and desserts that was a lot of more fun!!


First, I want to say that my favorite piece from this table was the cupcake stand that I bought at Ross! It is so dang cute and it was only about $4.00 so I had to have it. My other favorite things are the little chalkboards mini tags that I used to label the food. I got them from Michael’s in their dollar bin section. It was a pack of about 12 so I only needed 1 pack, but bought 2 just in case. I also purchased a white pen from Michael’s that I used to write on the chalkboards (for fear of not being able to find mini chalks). You can find similar tags on Ebay but I’m not sure if they are the same thing, but they look very similar. I also bought a mini easel chalkboard from the same dollar bin, and my sister wrote a happy birthday message for me.

The Rosette Tablecloth was my ultimate favorite, when I found that fabric at the Fabric District in Los Angeles (that should be a whole other blog). I had to buy it and that was how I ended up deviating from my original color scheme, but it didn’t matter I love this fabric. I also purchased the chair covers and peacock feathers while visiting the alleys and it was a great bargain!!


I bought silver trays from Dollar Tree and I placed a round paper doilie on top (bought the doilies a while back also from Dollar Tree from their wedding section).


I made confetti flavored pink with white sprinkles cake pops (see here for about my a helpful cake pop maker) and I placed some on a bowl (also from Dollar Tree) and added some white river stones/rocks (another from Dollar Tree). The rocks allowed for the pops to stay standing. Since I made about 30 pops, I also placed some upside down on mini cupcake liners, and arranged those on a white dinner plate.


Cupcakes, Chocolate dipped strawberries, and chocolate mustaches completed the dessert table. To make the chocolate mustaches I purchased a Wilton Mustache Chocolate Mold and some Wilton Dark Chocolate candy melts, I followed the directions on the mold and presto!!
I used the same Wilton chocolate melts for the Chocolate dipped Strawberries.


I also had a Candy Buffet. I already owned clear vases, bought those awhile ago for another candy buffet for a baby shower for my brother and sister-in-law (that was shown in the blog about the Rosette Ball). To stick to the theme this time I went in search for 20's candies. I found a list of the candy to purchase through Old Time Candy. I ended up purchasing Mary Janes (those came in a cute box so I used the box as decoration on the table) Red Vines, Sugar Daddies, Dum Dums and Strawberry filled hard candy, all from the Dollar Tree (yes, I know I love this store). On that table we also added some pre-made pastries that I bought for the dessert table, but I ran out of room. The mini cinnamon roll bites were so good ($6.99 at Costco) and some cheese cake and raspberry filled tarts, I just couldn't not add them somewhere.


I did purchase Candy Cigarettes from The Old Time Candy, and they were a hit!! Wish I would had also bought the Charleston Chew candy!! Those were not as easy to track down in a store.


I also made some No Bake cheesecake and yogurt parfaits with fresh fruit and pre-served them on plastic shooters. The best part was the little appetizer spoons and forks that I bought for those (4in forks and spoons from Party City @ $5ea. pack of 40).
For the No Bake Cheesecake I used JELL-O® No-Bake Mini Cheesecakes.


Instead of cracker crust I crumbled a chocolate cupcake and added it to the bottom of the shot glass before adding the cheesecake. Added a slice of a strawberry, an dollop of cake frosting and chocolate syrup.


The yogurt parfait was just granola, vanilla yogurt, strawberries and blueberries. Alternating in layers, although due to limited space I think it was just one layer of each.


My cake was Chocolate with fresh strawberry filling!! I followed a rosette cake tutorial: here.
Unfortunately, we had to keep my cake inside the house, since we didn’t make enough space for the cake on the dessert table. Though, it was probably for the best so outdoor issues didn't ruin it. The Cake and the DIY stand looked pretty nice if I say so myself. My inspiration, had a price tag of $40 for the smallest one in a store, so I went DIY. I followed the instructions from this pin. The only slight different was, instead it was sprayed white and had added trim. The spray and trim were purchased at Michael's. I couldn't find the info on the their website, but it was in the same aisle as all the ribbon. I only needed 1 spool and it all came out to like $7.00 including spray paint, plate and wine glass (instead of candle holder).


For the table, since I wanted a dinner style party, I got 3 rectangular tables and placed them in a long line. I bought fabric to match the rosette fabric from the dessert table and used that as a table cloth. Since I host thanksgiving at my house I have charger plates galore, so I took those bad boys out, mixed an matched them and added my collection of wine and margarita glasses to add a glamorous touch. My mom made the floral centerpieces for me using fresh roses, star gazer lilies, baby’s breath, Irish bells, Hydrangeas, Blue Delphiniums and a peacock feather. I had 1 candelabrum from a while ago, and I found another at my local Swap meet for $2 and I borrowed the other from my sister-in-law.

I dangled fake pearl beads from the candelabras and placed candles (even citronella ones for the uninvited guest) and mirrors for decorations. I also bought mini wine bottles, and placed them in little wood crates I bought from Michael’s for a dollar. I added some gift basket shred and it looked cute.


For additional dƩcor I bought 18ct black music notes form Party City to add to a canopy and the front wood gate.


If you noticed we had a few spots with great fabric hanging around, it worked out for a little photo spot. There's plenty of make your own photo booth props you can find online, just Google photo booth props, print them on card stock glue the prop into the foam paper, with the skewer in between and presto, they were done. I'm sure you can find some on Pinterest as well. We were also very lucky to have a friend show up later in the night and set up a full on real photo booth, he also had his own props and everyone had a blast. 


I also pulled out some of my vintage feel items from around the house and added a extra little sitting/photo spot. Always eye items you already have! (The trunk you see there is a family heirloom that my mother-in-law gave me when we purchased our home...after I had been asking for it for a year, hehe!!) You'll be surprised how well the items you find laying around work and way cheaper then buying more just to use for one party!

What I believe made the party, besides the booze, photo booth, family and great friends was a Rockola (aka jukebox) I rented. Unfortunately, it did not have much English Karaoke music, but since it is very versatile and it played music videos and plain ol’ music, and although a little out of era, we played Frank Sinatra (it’s still Jazz right?!) for a few hours until everyone was brave enough to make their own music request.

This was a very stress free event...other than trying to decided what to wear. Though figuring that out was a fun excuse to look at vintage pictures, watch "Great Gatsby" with my sister. Research is very helpful.