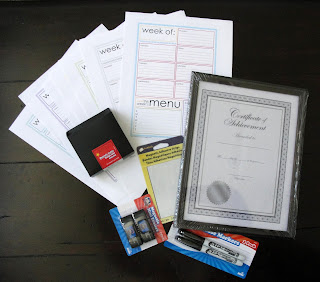
This project wasn't as easy as I first perceived. It became a little game of trial and error, but I'll give you what I've learned and you can make the best decision. Let me begin by giving you a list of some awesome sites with some print out organizing sheets that may/may not work for you and your lifestyle needs or at least this project. The one in my main image came from: Artsy Fartsy Mama (btw, she's AWESOME). There's a huge list of sites complied on: Creative Organizing. I also have a tear off sheet shopping list version idea from pinned from here: Infarrantly Creative. If you chose to go with that sites, you are going to want to tweak the list so you can make it a list but not in the tear off form or go ahead and go with that blog idea, but it won't work this blog. In the end I went with a simple white sheet with a cute script saying "Things To Buy" & a sharpie drawn heart in the bottom corner cause our hand writing was to big for this cute weekly layout. (I'll show you later.)
Whatever style sheet you chose to print you'll put in the frame behind the glass and use like a dry erase board. Dry Erase Marker whatever you need or to make note of and use your cell phone to take a picture before each store trip so no extra trees killed and just erase off the list whatever you got. Really when do we ever go shopping without our cellphones anyhow? This really makes it easier then finding a little scrap of paper in our purse to.
What you need: 1 Document Size Frame, unless you wanna cut your paper to whatever size this just saves a step. Whatever sheet from the printer. Dry Erase Markers & Erasers. Found ours in the cheap bins at Target. Magnet strips from Micheal's. You will need in addition to picture, craft glue. If you are lucky you will find at the Dollar Store already made magnetic pencil holder. I think intended for "Back to School" locker organization, so check those sections of your stores.
*TIP* If your frame has metal hooks for wall you may want to remove, as to not scratch your fridge.
Now put your sheet in. push Down your tabs and check the width of your magnet strip.
Ours was perfect to go on the cardboard an touch the fridge, if yours won't be so great you may want to cut and glue the magnet into strips to be placed the edge of the frame.
Here's where we had a lesson. We didn't run into any weight issues or our magnets giving out, but originally we didn't add any craft glue. I didn't think of a issue needing to worry about this. I had my husband test slamming the refrigerator door open and shut with out it moving so much as a milometer. We just trusted in the sticker part, well it got so humid that it just let go, we got lucky and it wasn't a issue so I reinforced it with craft glue and now that baby hasn't budged...and it's been even more humid.
It's been awhile now & it's still up an being used, eventually I'll change it out to a cuter piece of paper maybe add a defined Farmer's Market section, but this has really helped us. Hope it helps you just as much.


No comments:
Post a Comment